Execute Workitem
A job that executes a specified Activity, using specified input files and generating appropriate output files.
The relationship between an Activity and WorkItem can be thought of as a “function definition” and “function call”, respectively. The Activity specifies the AppBundle(s) to use, which in turn specify the Engine to use. The Workitem is then called to execute those.
In this tutorial sample, the workitem specifies the input file URL, the input JSON data with the new parameter values, and the destination URL for the output file. This sample will upload the input file to a OSS bucket before starting the workitem.
- Node.js & VSCode
- .NET 6 & VSCode
- .NET 6 & VS2022
The following apis should be added to the DesignAutomation.js file before the last line module.exports = router;
- StartWorkitem
This is where we actually start the Design Automation. This endpoint also uploads the input file to an OSS Bucket and define that the output should be saved at the same bucket. To help you identify the files, both input and output uses the same original file name, but with a suffix (input or output) plus a time stamp.
/// <summary>
/// Direct To S3
/// ref : https://aps.autodesk.com/blog/new-feature-support-direct-s3-migration-inputoutput-files-design-automation
/// </summary>

const getObjectId = async (bucketKey, objectKey, req) => {
  try {
    let contentStream = _fs.createReadStream(req.file.path);

    //uploadResources takes an Object or Object array of resource to uplaod with their parameters,
    //we are just passing only one object.
    let uploadResponse = await new ForgeAPI.ObjectsApi().uploadResources(
      bucketKey,
      [
        //object
        {
          objectKey: objectKey,
          data: contentStream,
          length: req.file.size,
        },
      ],
      {
        useAcceleration: false, //Whether or not to generate an accelerated signed URL
        minutesExpiration: 20, //The custom expiration time within the 1 to 60 minutes range, if not specified, default is 2 minutes
        onUploadProgress: (data) => console.warn(data), // function (progressEvent) => {}
      },
      req.oauth_client,
      req.oauth_token
    );
    //lets check for the first and only entry.
    if (uploadResponse[0].hasOwnProperty("error") && uploadResponse[0].error) {
      throw new Error(uploadResponse[0].completed.reason);
    }
    console.log(uploadResponse[0].completed.objectId);
    return uploadResponse[0].completed.objectId;
  } catch (ex) {
    console.error("Failed to create ObjectID\n", ex);
    throw ex;
  }
};
/// <summary>
/// Start a new workitem
/// </summary>
router.post(
  "/aps/designautomation/workitems",
  multer({
    dest: "uploads/",
  }).single("inputFile"),
  async (/*StartWorkitem*/ req, res) => {
    const input = req.body;

    // basic input validation
    const workItemData = JSON.parse(input.data);
    const widthParam = parseFloat(workItemData.width);
    const heigthParam = parseFloat(workItemData.height);
    const activityName = `${Utils.NickName}.${workItemData.activityName}`;
    const browserConnectionId = workItemData.browserConnectionId;

    // save the file on the server
    const ContentRootPath = _path.resolve(_path.join(__dirname, "../.."));
    const fileSavePath = _path.join(
      ContentRootPath,
      _path.basename(req.file.originalname)
    );

    // upload file to OSS Bucket
    // 1. ensure bucket existis
    const bucketKey = Utils.NickName.toLowerCase() + "-designautomation";
    try {
      let payload = new ForgeAPI.PostBucketsPayload();
      payload.bucketKey = bucketKey;
      payload.policyKey = "transient"; // expires in 24h
      await new ForgeAPI.BucketsApi().createBucket(
        payload,
        {},
        req.oauth_client,
        req.oauth_token
      );
    } catch (ex) {
      // in case bucket already exists
    }
    // 2. upload inputFile
    const inputFileNameOSS = `${new Date()
      .toISOString()
      .replace(/[-T:\.Z]/gm, "")
      .substring(0, 14)}_input_${_path.basename(req.file.originalname)}`; // avoid overriding
    // prepare workitem arguments
    const bearerToken = ["Bearer", req.oauth_token.access_token].join(" ");
    // 1. input file
    const inputFileArgument = {
      url: await getObjectId(bucketKey, inputFileNameOSS, req),
      headers: { Authorization: bearerToken },
    };
    // 2. input json
    const inputJson = {
      width: widthParam,
      height: heigthParam,
    };
    const inputJsonArgument = {
      url:
        "data:application/json, " +
        JSON.stringify(inputJson).replace(/"/g, "'"),
    };
    // 3. output file
    const outputFileNameOSS = `${new Date()
      .toISOString()
      .replace(/[-T:\.Z]/gm, "")
      .substring(0, 14)}_output_${_path.basename(req.file.originalname)}`; // avoid overriding
    const outputFileArgument = {
      url: await getObjectId(bucketKey, outputFileNameOSS, req),
      verb: dav3.Verb.put,
      headers: { Authorization: bearerToken },
    };

    // prepare & submit workitem
    // the callback contains the connectionId (used to identify the client) and the outputFileName of this workitem
    const callbackUrl = `${config.credentials.webhook_url}/api/aps/callback/designautomation?id=${browserConnectionId}&outputFileName=${outputFileNameOSS}&inputFileName=${inputFileNameOSS}`;
    const workItemSpec = {
      activityId: activityName,
      arguments: {
        inputFile: inputFileArgument,
        inputJson: inputJsonArgument,
        outputFile: outputFileArgument,
        onComplete: {
          verb: dav3.Verb.post,
          url: callbackUrl,
        },
      },
    };
    let workItemStatus = null;
    try {
      const api = await Utils.dav3API(req.oauth_token);
      workItemStatus = await api.createWorkItem(workItemSpec);
    } catch (ex) {
      console.error(ex);
      return res.status(500).json({
        diagnostic: "Failed to create a workitem",
      });
    }
    res.status(200).json({
      workItemId: workItemStatus.id,
    });
  }
);
- OnCallback
When the workitem is done, Design Automation will callback our app (using the ngrok forwarding URL). This function will handle it and push a notification to the client (using socketIO).
/// <summary>
/// Callback from Design Automation Workitem (onProgress or onComplete)
/// </summary>
router.post(
  "/aps/callback/designautomation",
  async (/*OnCallback*/ req, res) => {
    // your webhook should return immediately! we could use Hangfire to schedule a job instead
    // ALWAYS return ok (200)
    res.status(200).end();

    try {
      const socketIO = require("../server").io;

      // your webhook should return immediately! we can use Hangfire to schedule a job
      const bodyJson = req.body;
      socketIO.to(req.query.id).emit("onComplete", bodyJson);

      http.get(bodyJson.reportUrl, (response) => {
        //socketIO.to(req.query.id).emit('onComplete', response);
        response.setEncoding("utf8");
        let rawData = "";
        response.on("data", (chunk) => {
          rawData += chunk;
        });
        response.on("end", () => {
          socketIO.to(req.query.id).emit("onComplete", rawData);
        });
      });

      const objectsApi = new ForgeAPI.ObjectsApi();
      const bucketKey = Utils.NickName.toLowerCase() + "-designautomation";
      if (bodyJson.status === "success") {
        try {
          //create a S3 presigned URL and send to client
          let response = await objectsApi.getS3DownloadURL(
            bucketKey,
            req.query.outputFileName,
            { useAcceleration: false, minutesExpiration: 15 },
            req.oauth_client,
            req.oauth_token
          );
          socketIO.to(req.query.id).emit("downloadResult", response.body.url);
        } catch (ex) {
          console.error(ex);
          socketIO
            .to(req.query.id)
            .emit(
              "onComplete",
              "Failed to create presigned URL for outputFile.\nYour outputFile is available in your OSS bucket."
            );
        }
      }

      // delete the input file (we do not need it anymore)
      try {
        await objectsApi.deleteObject(
          bucketKey,
          req.query.inputFileName,
          req.oauth_client,
          req.oauth_token
        );
      } catch (ex) {
        console.error(ex);
      }
    } catch (ex) {
      console.error(ex);
    }
  }
);
- ClearAccount
/// <summary>
/// Clear the accounts (for debugging purpouses)
/// </summary>
router.delete(
  "/aps/designautomation/account",
  async (/*ClearAccount*/ req, res) => {
    let api = await Utils.dav3API(req.oauth_token);
    // clear account
    await api.deleteForgeApp("me");
    res.status(200).end();
  }
);
The following apis should be added to the DesignAutomationController.cs file before the last line GetDefinedActivities method.
- StartWorkitem
This is where we actually start the Design Automation. This endpoint also uploads the input file to an OSS Bucket and define that the output should be saved at the same bucket. To help you identify the files, both input and output uses the same original file name, but with a suffix (input or output) plus a time stamp.
    /// <summary>
    /// Direct To S3
    /// ref : https://aps.autodesk.com/blog/new-feature-support-direct-s3-migration-inputoutput-files-design-automation
    /// </summary>
    static void onUploadProgress(float progress, TimeSpan elapsed, List<UploadItemDesc> objects)
    {
        Console.WriteLine("progress: {0} elapsed: {1} objects: {2}", progress, elapsed, string.Join(", ", objects));
    }
    public static async Task<string> GetObjectId(string bucketKey, string objectKey, dynamic oauth, string fileSavePath)
    {
        try
        {
            ObjectsApi objectsApi = new ObjectsApi();
            objectsApi.Configuration.AccessToken = oauth.access_token;
            List<UploadItemDesc> uploadRes = await objectsApi.uploadResources(bucketKey,
                new List<UploadItemDesc> {
                    new UploadItemDesc(objectKey, await System.IO.File.ReadAllBytesAsync(fileSavePath))
                },
                null,
                onUploadProgress,
                null);
            Console.WriteLine("**** Upload object(s) response(s):");
            DynamicDictionary objValues = uploadRes[0].completed;
            objValues.Dictionary.TryGetValue("objectId", out var id);

            return id?.ToString();
        }
        catch (Exception ex)
        {
            Console.WriteLine($"Exception when preparing input url:{ex.Message}");
            throw;
        }
    }

    /// <summary>
    /// Input for StartWorkitem
    /// </summary>
    public class StartWorkitemInput
    {
        public IFormFile inputFile { get; set; }
        public string data { get; set; }
    }

    /// <summary>
    /// Start a new workitem
    /// </summary>
    [HttpPost]
    [Route("api/aps/designautomation/workitems")]
    public async Task<IActionResult> StartWorkitem([FromForm] StartWorkitemInput input)
    {
        // basic input validation
        JObject workItemData = JObject.Parse(input.data);
        string widthParam = workItemData["width"].Value<string>();
        string heigthParam = workItemData["height"].Value<string>();
        string activityName = string.Format("{0}.{1}",
                                    NickName, workItemData["activityName"].Value<string>());
        string browserConnectionId = workItemData["browserConnectionId"].Value<string>();

        // save the file on the server
        var fileSavePath = Path.Combine(_env.ContentRootPath, Path.GetFileName(input.inputFile.FileName));
        using (var stream = new FileStream(fileSavePath, FileMode.Create))
        await input.inputFile.CopyToAsync(stream);

        // OAuth token
        dynamic oauth = await OAuthController.GetInternalAsync();

        // upload file to OSS Bucket
        // 1. ensure bucket existis
        string bucketKey = NickName.ToLower() + "-designautomation";
        BucketsApi buckets = new BucketsApi();
        buckets.Configuration.AccessToken = oauth.access_token;
        try
        {
            PostBucketsPayload bucketPayload = new PostBucketsPayload(bucketKey, null,
                                                    PostBucketsPayload.PolicyKeyEnum.Transient);
            await buckets.CreateBucketAsync(bucketPayload, "US");
        }
        catch { }; // in case bucket already exists
                    // 2. upload inputFile
        string inputFileNameOSS = string.Format("{0}_input_{1}",
                                                DateTime.Now.ToString("yyyyMMddhhmmss"),
                                                Path.GetFileName(input.inputFile.FileName));// avoid overriding


        // prepare workitem arguments
        // 1. input file
        XrefTreeArgument inputFileArgument = new XrefTreeArgument()
        {
            Url = await GetObjectId(bucketKey, inputFileNameOSS, oauth, fileSavePath),
            Headers = new Dictionary<string, string>()
            {
               { "Authorization", "Bearer " + oauth.access_token}
            }
        };

        // 2. input json
        dynamic inputJson = new JObject();
        inputJson.Width = widthParam;
        inputJson.Height = heigthParam;
        XrefTreeArgument inputJsonArgument = new XrefTreeArgument()
        {
            Url = "data:application/json, " + ((JObject)inputJson).ToString(Formatting.None).Replace("\"", "'")
        };
        // 3. output file
        string outputFileNameOSS = string.Format("{0}_output_{1}",
                                                    DateTime.Now.ToString("yyyyMMddhhmmss"),
                                                    Path.GetFileName(input.inputFile.FileName)); // avoid overriding

        XrefTreeArgument outputFileArgument = new XrefTreeArgument()
        {
            Url = await GetObjectId(bucketKey, outputFileNameOSS, oauth, fileSavePath),
            Headers = new Dictionary<string, string>()
            {
                { "Authorization", "Bearer " + oauth.access_token}
            },
            Verb = Verb.Put
        };

        if (System.IO.File.Exists(fileSavePath))
        {
            System.IO.File.Delete(fileSavePath);
        }

        // prepare & submit workitem
        string callbackUrl = string.Format("{0}/api/aps/callback/designautomation?id={1}&outputFileName={2}",
                                            OAuthController.GetAppSetting("APS_WEBHOOK_URL"),
                                            browserConnectionId, outputFileNameOSS);
        WorkItem workItemSpec = new WorkItem()
        {
            ActivityId = activityName,
            Arguments = new Dictionary<string, IArgument>()
            {
                { "inputFile", inputFileArgument },
                { "inputJson",  inputJsonArgument },
                { "outputFile", outputFileArgument },
                { "onComplete", new XrefTreeArgument { Verb = Verb.Post, Url = callbackUrl } }
            }
        };
        WorkItemStatus workItemStatus = await _designAutomation.CreateWorkItemAsync(workItemSpec);

        return Ok(new { WorkItemId = workItemStatus.Id });
    }
- OnCallback
    /// <summary>
    /// Callback from Design Automation Workitem (onProgress or onComplete)
    /// </summary>
    [HttpPost]
    [Route("/api/aps/callback/designautomation")]
    public async Task<IActionResult> OnCallback(string id, string outputFileName, [FromBody] dynamic body)
    {
        try
        {
            // your webhook should return immediately! we can use Hangfire to schedule a job
            JObject bodyJson = JObject.Parse((string)body.ToString());
            await _hubContext.Clients.Client(id).SendAsync("onComplete", bodyJson.ToString());

            using (var httpClient = new HttpClient())
            {
                byte[] bs = await httpClient.GetByteArrayAsync(bodyJson["reportUrl"]?.Value<string>());
                string report = System.Text.Encoding.Default.GetString(bs);
                await _hubContext.Clients.Client(id).SendAsync("onComplete", report);
            }

            // OAuth token
            dynamic oauth = await OAuthController.GetInternalAsync();

            ObjectsApi objectsApi = new ObjectsApi();
            objectsApi.Configuration.AccessToken = oauth.access_token;

            ApiResponse<dynamic> res = await objectsApi.getS3DownloadURLAsyncWithHttpInfo(
                                        NickName.ToLower()+"-designautomation",
                                        outputFileName, new Dictionary<string, object> {
                                        { "minutesExpiration", 15.0 },
                                        { "useCdn", true }
                                        });
            await _hubContext.Clients.Client(id).SendAsync("downloadResult", (string)(res.Data.url));
            Console.WriteLine("Congrats!");
        }
        catch (Exception ex)
        {
            Console.WriteLine(ex.Message);
        }

        // ALWAYS return ok (200)
        return Ok();
    }
- ClearAccount
Last, but not least, to help you test, this api removes all appbundles and activities from your account.
    /// <summary>
    /// Clear the accounts (for debugging purposes)
    /// </summary>
    [HttpDelete]
    [Route("api/aps/designautomation/account")]
    public async Task<IActionResult> ClearAccount()
    {
        // clear account
        await _designAutomation.DeleteForgeAppAsync("me");
        return Ok();
    }
Everything ready!
Run & Debug
Now that your app is ready, it's time to run it. This is where we can test and check for possible errors (via debugging).
Using the sample
At the top-roght, click on Configure to define AppBundle & Activity. This only need to be done once. Specify the new width and height on the left panel, select the input file and click on Start workitem. The right panel should show the results.
You can find sample files here.
If the plugin code changes, then you need to upload a new AppBundle and increase the version (e.g. v1 to v2). This sample will create a new version every time a new AppBundle is uploaded.
Both input and output files are saved in OSS Buckets, you can use View Models tutorial to view them.
Troubleshooting
1. The results panel doesn't show the entire information
Make sure the ngrok is running and have not expired. Make sure the ngrok address is correctly specified at the environment variable.
2. Workitem execute, but result is not as expected
Consider use the Clear Account button. This removes all AppBundles & Activities on your account. Then define them again.
3. Cannot see my AppBundle at the Configuration form
The ZIP bundles are copied to the bundles after you Build the respective plugin. Make sure the Post-build event is properly defined and executed after build.
4. Ensuring the correct DLL was uploaded
A easy trick to ensure the correct DLL was uploaded to Design Automation is to check it's date. This StackOverflow answer shows how to get the Linker Date (i.e. when the DLL was compiled), with that you can show it on the begining of your code. Note the dates are on the server timezone.
Plugin is written in
C#irrespective of server language.
LogTrace("DLL {0} compiled on {1}",
    System.IO.Path.GetFileName(System.Reflection.Assembly.GetExecutingAssembly().Location),
    GetLinkerTime(System.Reflection.Assembly.GetExecutingAssembly()));
Ready? Let's run it!
- Node.js & VSCode
- .NET 6 & VSCode
- .NET 6 & VS2022
Go to the Debug menu and select Start debugging. The "Debug Console" tab should appear on the bottom, as shown below
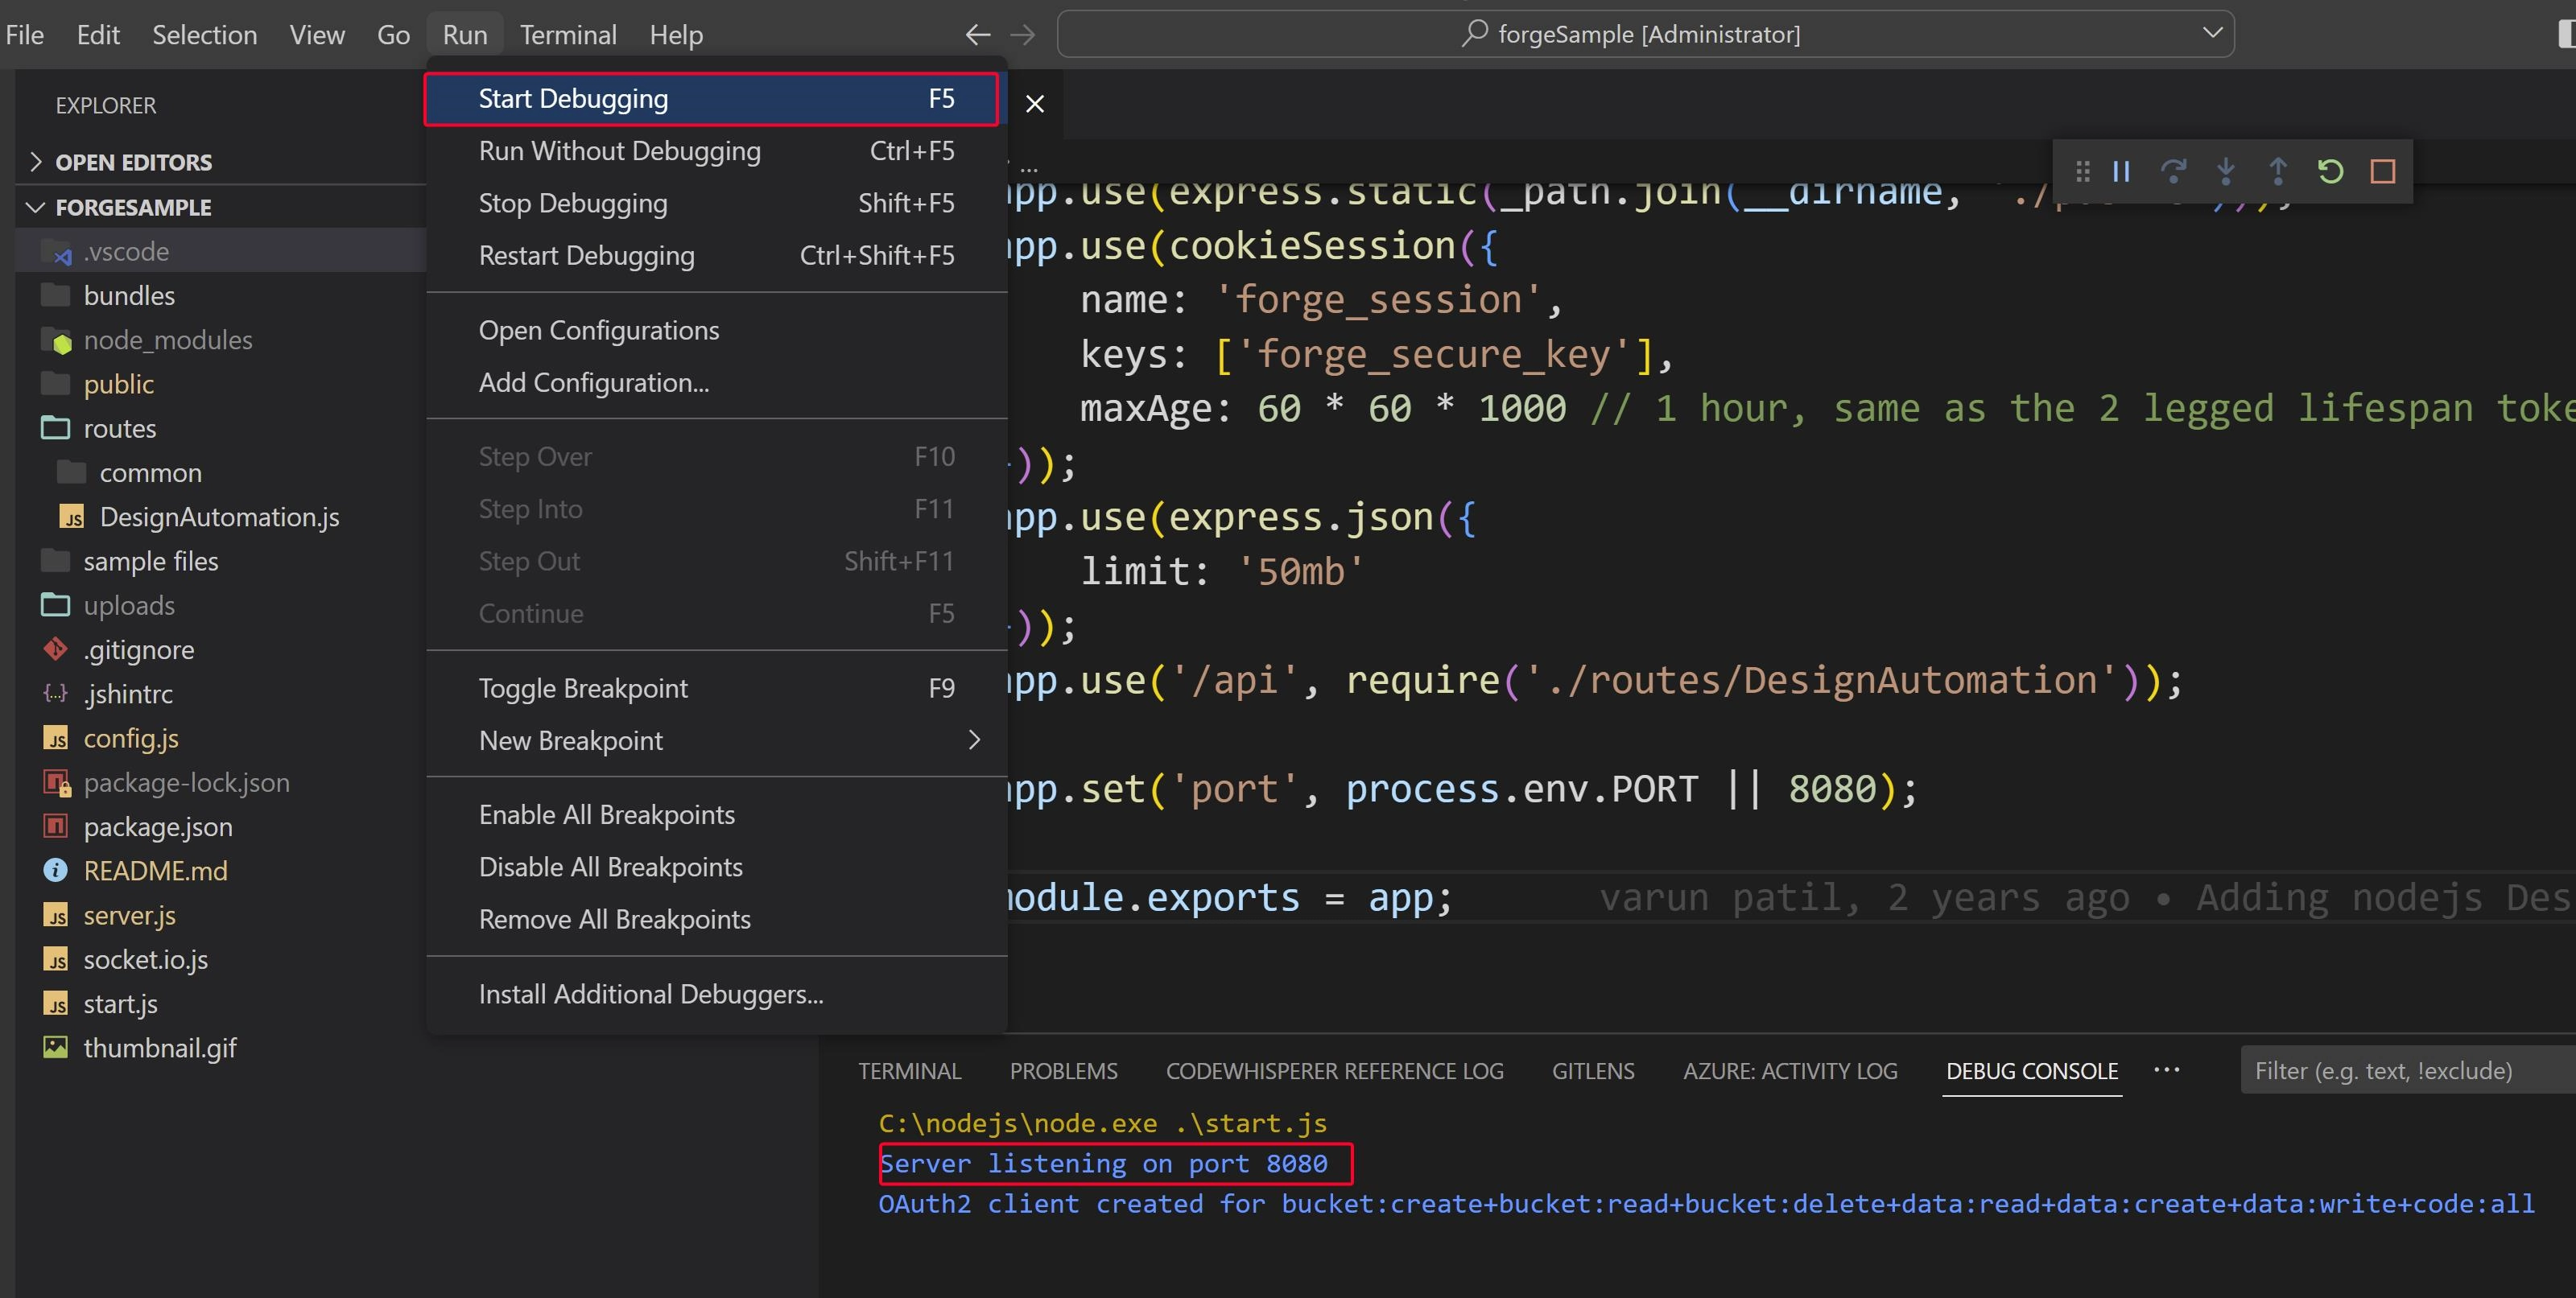
Open your browser and go to http://localhost:8080.
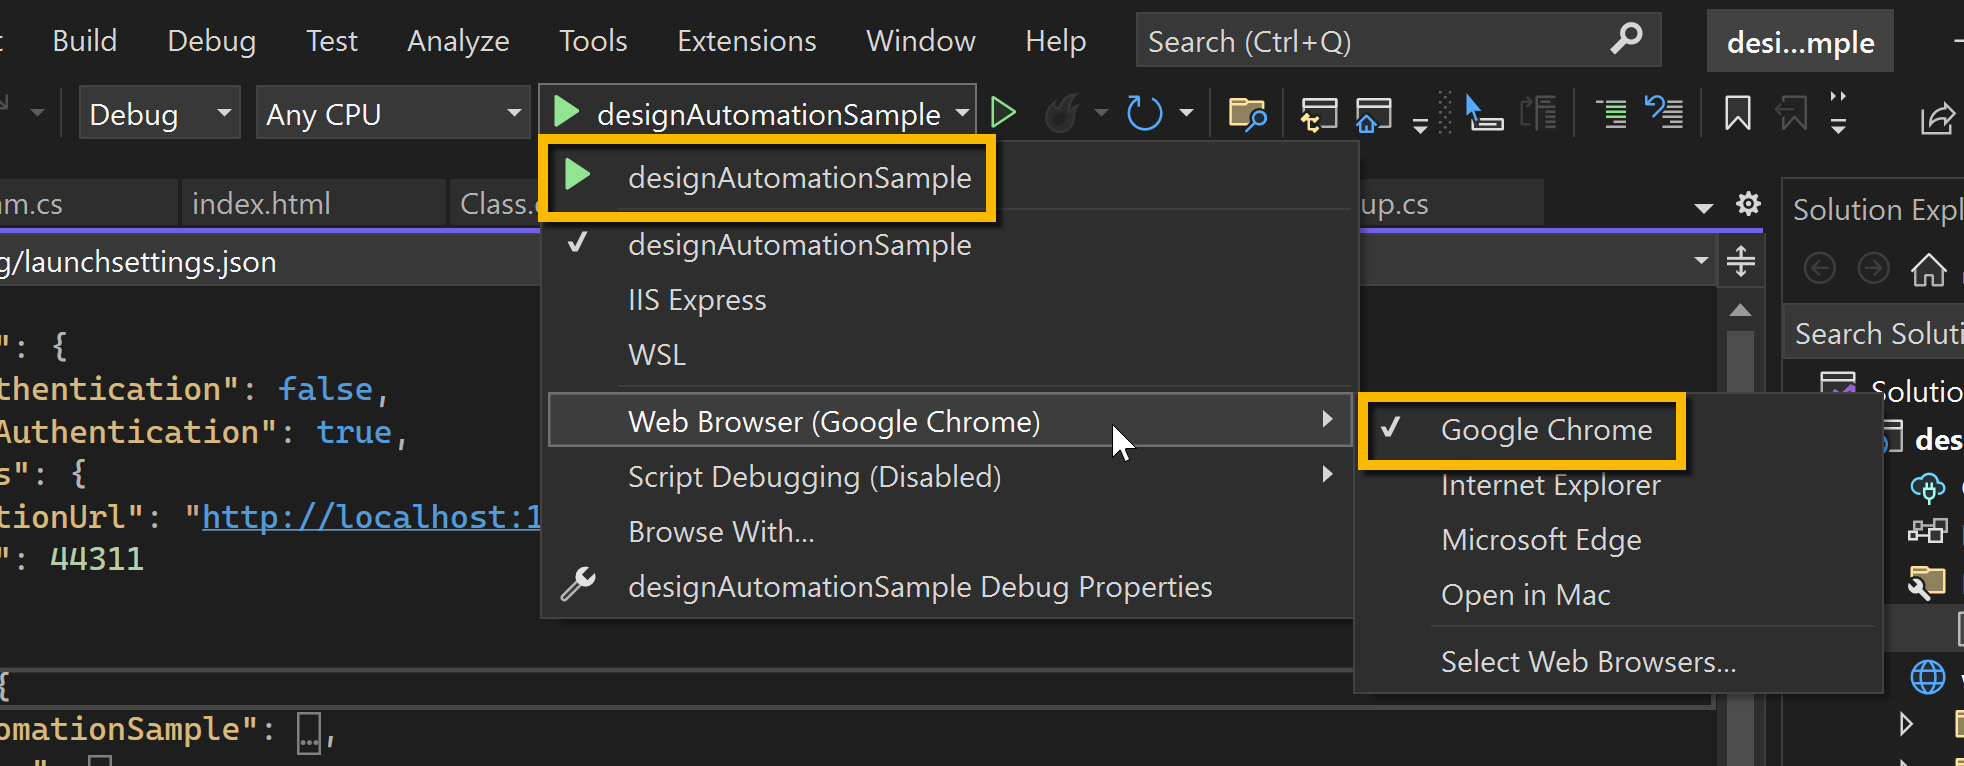
The .NET Core ASP.NET project that we created on Visual Studio is empty, therefore when we start it, nothing runs. As our designAutomationSample project now contains a starting page at wwwroot/index.html so we should see its contents upon launch.
Visual Studio should list all browsers available in the system for you pick one to start your project. Just select one and click on the "play" icon. The browser should open with your start page.